Showing LaTeX in LaTeX: The good, the bad and the ugly
LaTeX is a code-based word processing tool most known for typesetting mathematics and its further use in exact sciences, most notably publications. Hence many people in the industry will pick up the basics, often using material provided by the organization. Convenient for demonstration, the slides or reader is written in LaTeX. However, when trying to display literal LaTeX code, people tend to fall back to very rudimentary solutions. We can do better!
We'll explore the good, the bad and the ugly in typesetting LaTeX. Just in reverse order, to follow the thought process.
In this post:
The ugly: Just monospace #
In constrast to normal text, code if often shown in monospace, i.e. each character has
equal width, as it was in the early days of technology. Not just that, it is
also convenient when raw text is the only formatting you work with; just put
dashes on the next line, and you've got yourself some 'underlined' text.
In LaTeX, this font type can be selected using the \texttt{some text} command,
or when used between braces, {\ttfamily some text} formats everything in
monospace upto the the closing brace.
However, this is very merely a font switch, and \texttt{\maketitle} will not
print a literal \maketitle, but will perform \maketitle, creating
a title heading in monospace! To prevent command interpretation of a
backslash, one could resort to \texttt{\textbackslash maketitle}, which uses a
command to display a literal backslash.
The bad: Verbatim #
There is also a way to temporarily disable the command interpreting property of
a backslash, as well as other special characters (like %). In LaTeX code,
one can do \verb|\maketitle|. This prints \maketitle literally, and also in
monospace already. If you need to display the '|'-character, you can use
\verb!Exlamation points \verb|instead|.!. Or really any non-space character
you like, the character which delimits the begin, is the one which delimits the
end.
The \verb command is for in-line usage. To show multiple lines of code, or to
give it its own line, use is its block equivalent, the verbatim-environment:
And for this see the following code:
\begin{verbatim}
    \begin{document}
        \maketitle
    \end{document}
\end{verbatim}
However, the code is actually formatted as
\begin{document}
\maketitle
\end{document}
that is, indentation is lost. To fix this, use the
Verbatim-environment from the package fancyvrb. Add
\usepackage{fancyvrb} anywhere before your
\begin{document}, and then use
And for this see the following code:
\begin{Verbatim}[tabsize=4]
    \begin{document}
        \maketitle
    \end{document}
\end{Verbatim}
This preserves the indentation from the code. However, you might also experience everything being indented too much. That is because you naturally indent your LaTeX code, but those indentations are now picked up by Verbatim! Select the lines and Shift+Tab one or multiple times to unindent them. This might look a bit ugly in your LaTeX code, but hey, we've not yet arrived at the proper way either...
The good: Automatic colors #
You could actually add another level before this: using \texttt, but also
\textcolor to color different parts of the command manually. If you went down
that alley already, just wait until you read the next paragraph. Actually, don't
wait, go ahead!
The listings package provides code syntax highlighting for various code
languages. That includes LaTeX. However, it's syntax highlighting is very minimal
and doesn't do much coloring. Therefore, I wrote my own package, which you can
find at https://github.com/vkuhlmann/highlight-latex.
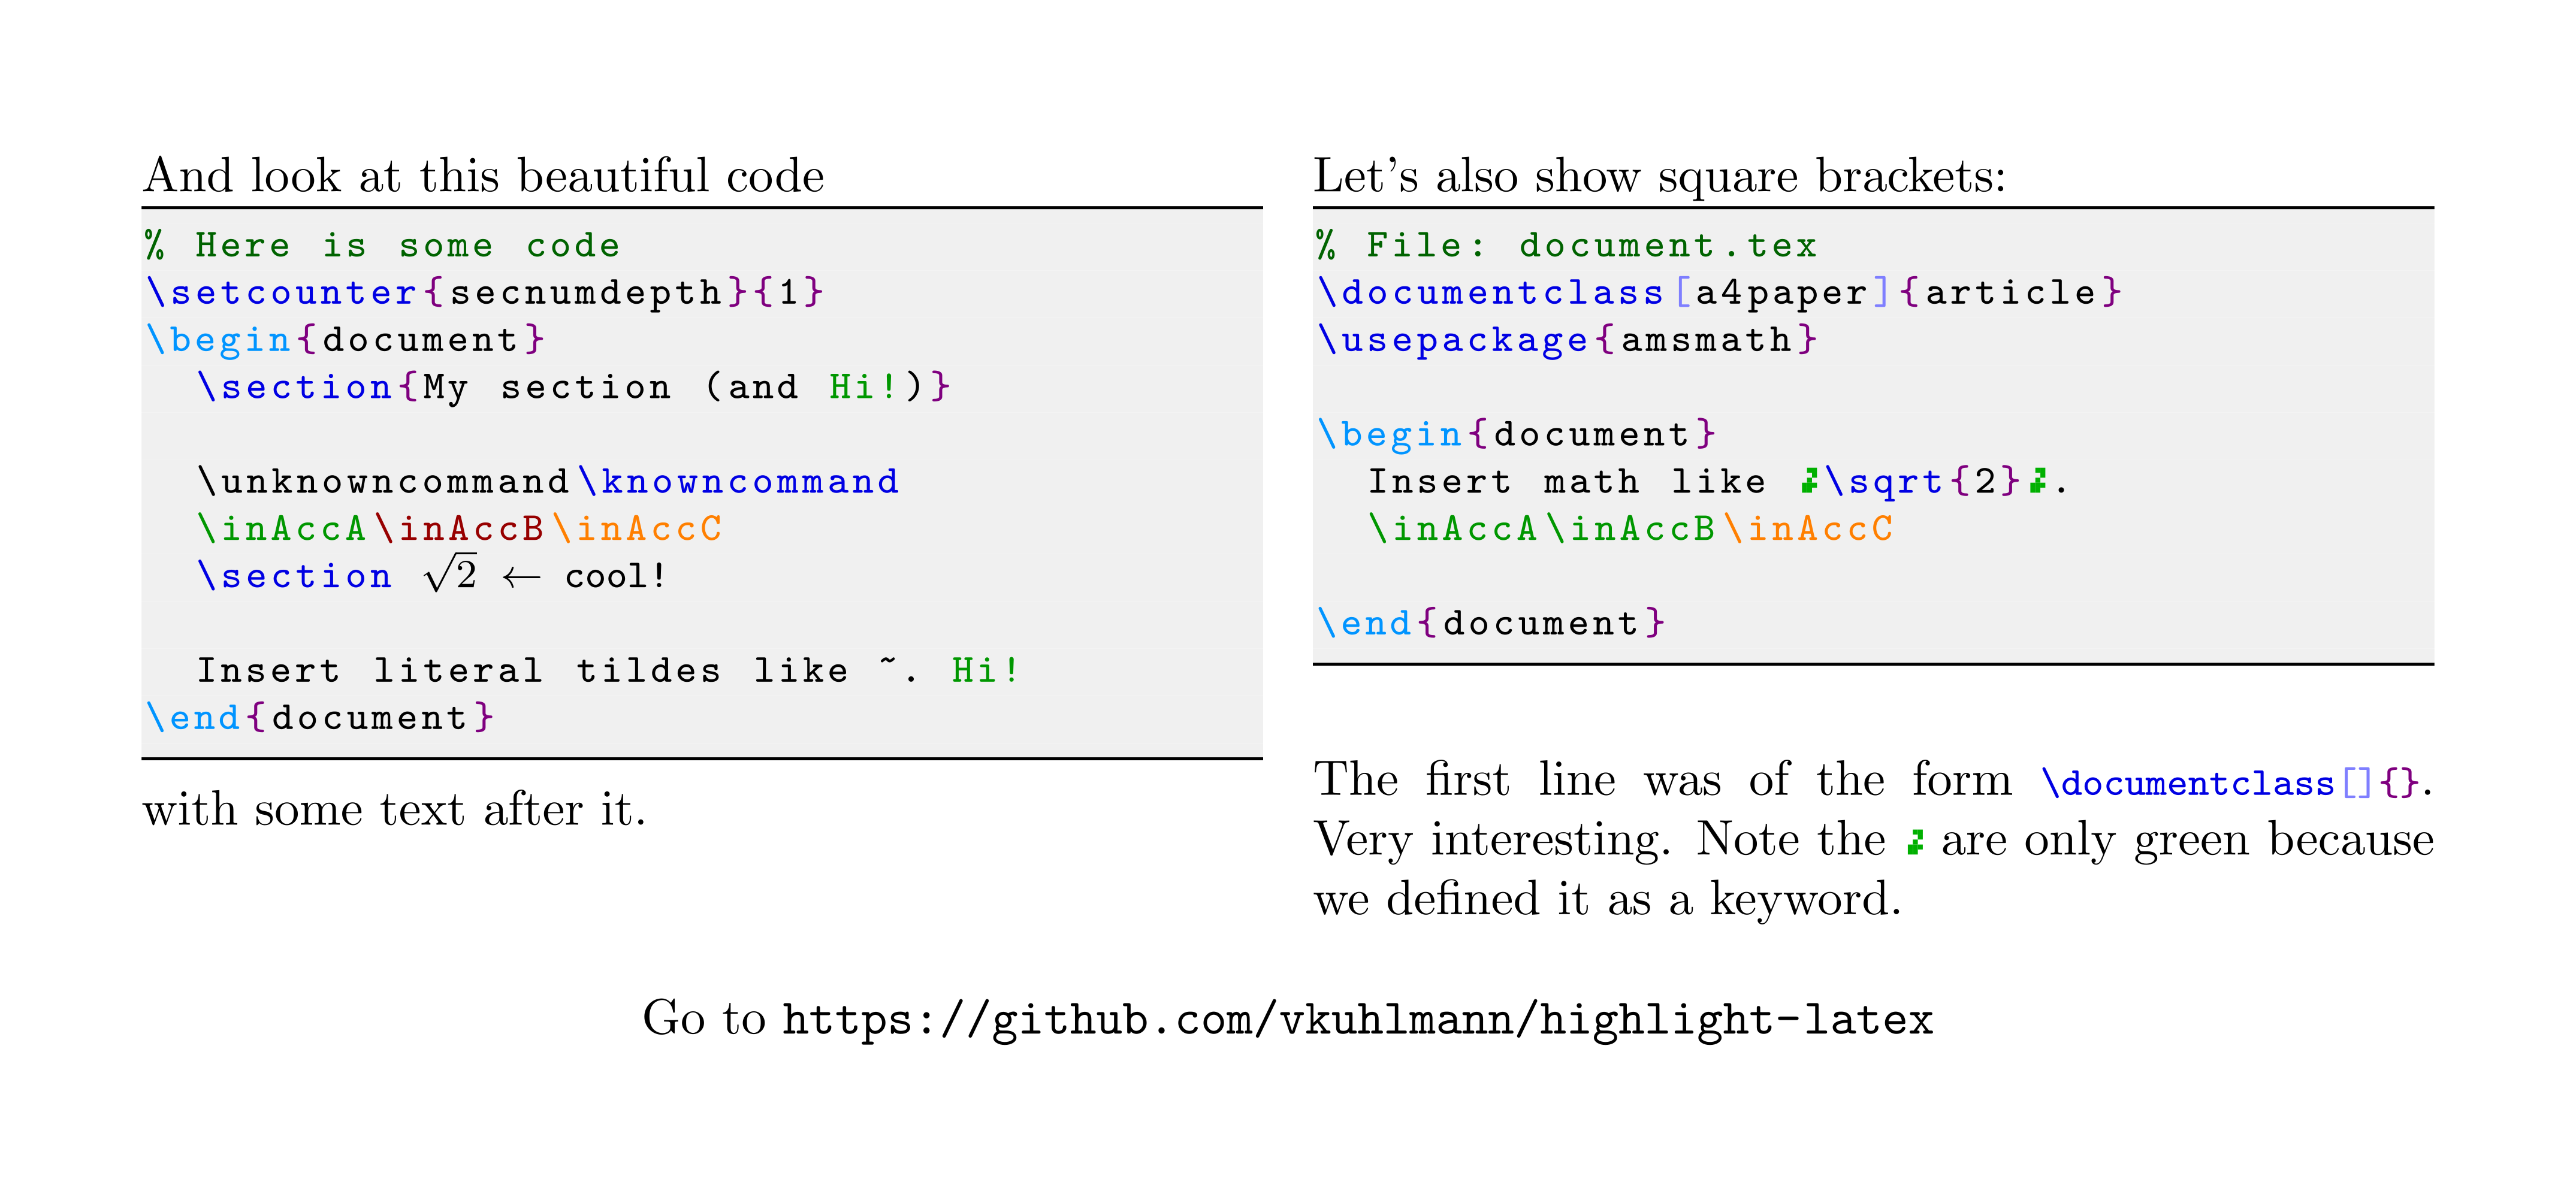
For example, if you want a block of highlighted code, it can be as easy as adding the package, and writing
\begin{highlightblock}
    % File: document.tex
    \documentclass[a4paper]{article}
    \usepackage{amsmath}

    \begin{document}
        Insert math like $\sqrt{2}$.
        \inAccA\inAccB\inAccC

    \end{document}
\end{highlightblock}
This generates the right box of the demo:

(Don't mind the failed dollar signs, it's due to conversion from PDF to an image.)
Then inline code is done using the \hll|\documentclass[]{}| command. There is
of course a bit more to it, at least if you want to have some commands colored
differently like in this demo. All this I've already explained on the project
page, so I refer you to:
https://github.com/vkuhlmann/highlight-latex
Happy LaTeXing!
